Making Beaded Jewelry
Making beaded jewelry is really simple. I think the hardest part is trying to decide which beads to use! There are just so many bead options out there today.
There are two basic techniques:
Using cord, leather, ribbon or chain and crimp ends
Or
Using flexible wire or thread and crimp beads
Making Beaded Jewelry
Using Crimp Ends
![making beaded jewelry, necklace making, jewelry making making beaded jewelry, necklace making, jewelry making](http://www.uniquehomemadegifts.com/images/finished-crystal-drop-necklace.jpg)
Crystal Drop Necklace
This is a beaded crystal necklace I made for my daughter
using chain and crimp ends.
Crimp ends will have a loop on one end, and an open end with two “flaps” or “arms” on the other. You fold the flaps/arms over or crimp around cord, leather, ribbon or chain. They come in many different sizes, colors and materials.
There are special crimp ends for leather and heavier cords, that have an extra “tooth” at the bottom to grab the leather or cord more firmly.
Ribbon ends remind me of an alligator or crocodile mouth. They are shaped in a “V” with a bunch of “teeth” to hold the ribbon tightly. These are just pressed together flat.
Click here for detailed, step-by-step jewelry making instructions, with pictures
(These are the instructions on how to make the necklace in the picture above.)
Making beaded jewelry with crimp ends:
- Cut your cord, leather, ribbon or chain to the desired length.
- Decide on which beads you are going to use. Remember that the hole in the bead will have to be large enough to string them onto whatever cord, leather, ribbon or chain you are using. It is much easier to figure out how you are going to arrange your beads before you start stringing them. It gets really annoying if you have to continually remove and re-string them.
Most beaded designs will have a certain pattern to the center point, then will have a focal point, like a pendant or a collection of beads, then will repeat the same bead pattern as before, only in reverse.
- Attach one crimp end with crimping pliers to one end of your cord (leather, etc.). You can just fold the “arms” into place with regular pliers, you just have to be careful not to pinch them together too tightly, or the arms could snap and break off. Crimping pliers eliminate this problem by giving you a round hole to set the arms in. That hole forces the arms to gently wrap around your cord.
- String on your beads in your desired order, then attach the other crimp end to the other end of your cord.
- Use jump rings through your crimp end loop to attach your clasp and clasp end.
That’s it. That really is all there is to it.
Making Beaded Jewelry
Using Crimp Beads
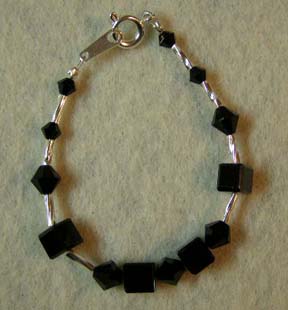
![making beaded jewelry, bracelet making, necklace making, jewelry making making beaded jewelry, bracelet making, necklace making, jewelry making](http://www.uniquehomemadegifts.com/images/finished-crystal-bracelet.jpg)
Crystal Bracelet
This is a bracelet I make for my daughter
using the crimp bead technique.
Crimp beads come in a variety of sizes, and a few different colors. They are made of very thin and pliable metal, which makes them easy to compress, or crimp.
This technique is a little more involved. There are a few more steps, and crimp beads can be a little more tricky to work with, than crimp ends. If you’re not careful, you can break them when you are trying to crimp them, or break the wire by crimping them too much. The easiest way to work with crimp beads is to use a set of crimping pliers.
How to Use Crimping Pliers
Crimping pliers have two holes in them. One is completely round on both sides. The other one is round on one side, and has a bump in the middle of the other. When you put the crimp bead into the hole with the bump, it will press the center of the bead together, while leaving both sides apart.
You then turn the bead sideways, and put it into the completely round hole. When you press the pliers together, the bead will be forced to fold in half. The round hole in the pliers makes this process gentle, and won’t allow the bead to be completely flattened. It is when you over flatten the crimp beads that you have problems with breaking either the bead or the wire.
Go to Bracelet Making for detailed, step-by-step jewelry making instructions and pictures of this process
(These are the instructions on how to make the bracelet in the picture above.)
Making beaded jewelry using crimp beads:
- Cut your wire or thread to the desired length. Make sure you leave a little extra length for the crimping process. (At least 2”, but up to 6” if this is your first try.)
- (Using a bead mat, or bead board for this step makes your life much easier.)
Layout your beads into a pattern. Decide on the order ahead of time. That way, you’ll know how many beads you need for your project, before you start stringing.
- Thread a crimp bead onto your wire. Thread on your clasp, or clasp end, onto the wire next. Loop the wire around the clasp, or clasp end, and thread it back through the crimp bead. Pull the wire tightly, but gently. Make sure to leave some room for the clasp or clasp end to move.
- Crimp the bead using the double crimp method described above.
- Cut your excess wire. (I do, some don’t. Some thread it back into the first couple beads.)
- Thread your beads in the desired order. End with a crimp bead.
- Thread on your clasp, or clasp end, whichever is left. Just like before, loop the wire around the clasp, or clasp end, and thread it back through the crimp bead. Pull the wire tightly, but gently, leaving room for movement.
- Crimp the bead using the double crimp method, same as before.
- Cut any excess wire. (Once again, some people thread this back through the last few beads. I don’t.)
You’re done. It’s not horribly more involved, just a little. Once you get used to using crimp beads and crimping pliers, this technique is just as easy as any of them.
Using only these two different techniques, the possibilities for making beaded jewelry are endless. Changing the style, size of type of beads, alone, makes a HUGE difference in the look of your final project.
You could even experiment with alternating regular beads with crimp beads. Crimp the crimp beads at regular, measured, intervals, locking the beads into place. This will give you a floating bead look.
The only limits you have when making beaded jewelry, is your imagination!
♥♥♥♥♥♥♥♥♥♥♥♥♥♥♥♥♥♥♥♥♥♥♥♥♥♥♥♥♥♥
Want to
Sign up for My Newsletter?
♥♥♥♥♥♥♥♥♥♥♥♥♥♥♥♥♥♥♥♥♥♥♥♥♥♥♥♥♥♥
Return to Jewelry Gifts
Return from Making Beaded Jewelry to Home